Ingredients and Equipment
Imagine the sun-kissed flavors of Italy mingling with the crisp, fresh allure of a garden salad. That’s what you’ll get with a Raw Zucchini Lasagna, a delightful dish that is as nourishing as it is vibrant. A pure celebration of raw, whole foods, this recipe is a perfect inclusion in any raw food enthusiast’s collection, appealing not just for its health benefits but for its burst of flavor as well.
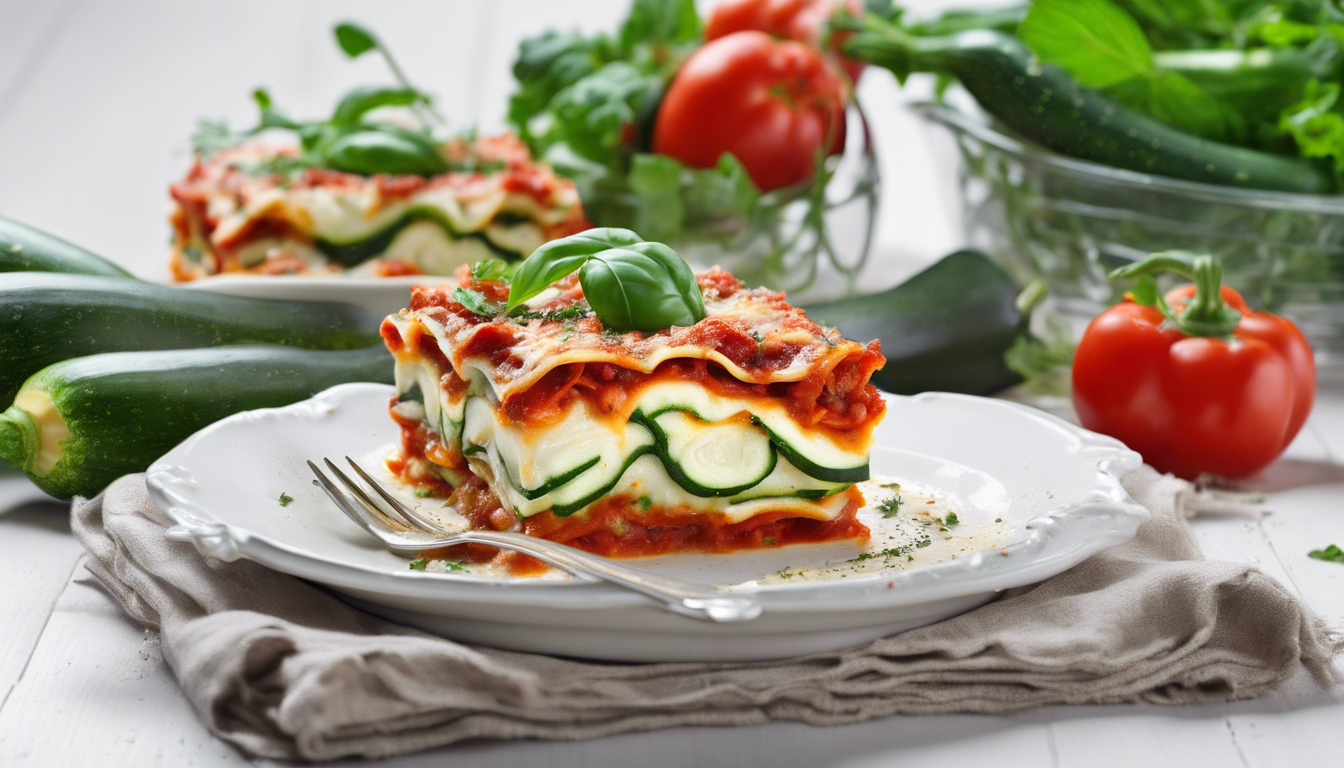
To embark on this culinary adventure, you’ll need a variety of fresh and wholesome ingredients. First and foremost, grab some large zucchinis – these will be the base of your lasagna, replacing traditional noodles. The fleshier, the better, as they’ll hold up well to becoming elegant layers in your dish.
Raw Zucchini Lasagna Ingredients:
- 4 large zucchinis
- 2 cups of raw cashews, soaked for 2 hours
- 1 lemon, juiced
- 2 cloves of garlic
- 1/2 cup of extra virgin olive oil
- 1 cup of fresh basil leaves
- 2 ripe tomatoes, sliced
- 1 cup of sun-dried tomatoes, soaked for 1 hour
- 1 cup of baby spinach
- 1/2 cup of pitted Kalamata olives
- 1/4 cup of nutritional yeast (for a cheesy flavor)
- Salt and pepper to taste
In addition to the fresh ingredients, let’s not forget the equipment you’ll need to craft your raw masterpiece:
Equipment List:
- A mandoline slicer or a sharp knife to slice the zucchini thinly and evenly.
- A food processor to whip up the cashew ‘ricotta’ and pesto layers.
- A blender for a smooth and creamy texture for sauces.
- A lasagna dish or a deep rectangular serving platter.
Remember that the quality of your ingredients will shine through in this simple, no-cook dish, so opt for organic whenever possible. And there’s no need for a fancy kitchen or obscure gadgets – just a love for fresh, vibrant flavors and a passion for healthful, creative cuisine.
With your ingredients gathered and your equipment on standby, you’ll find yourself ready to peel, process, and layer your way into the hearts of anyone lucky enough to try a bite of your Raw Zucchini Lasagna.
Preparing the Zucchini Layers
Now that our ingredients are in line and our kitchen tools are at the ready, it’s time to embrace the heart of our Raw Zucchini Lasagna – the zucchini layers themselves. Approach this step with a slice of care and an ounce of finesse, for these ribbons of green goodness are what give our lasagna its structure and satisfying bite.
To begin, take those fresh zucchinis you selected earlier; they are about to transition into the star of the show. Trim the ends off each zucchini, as these can be a little tough. Stand one up on its end and, using either a mandoline slicer or a sharp knife, carefully slice down the length of the zucchini to create long, thin strips. These strips will mimic the traditional pasta layers in regular lasagna, but with the added benefit of being fresh, low in calories, and wonderfully nutritious.
If you are using a mandoline, guard your fingers carefully and use the safety holder that comes with it. Aim for slices about 1/8-inch thick – thin enough to be pliable, yet thick enough to hold up to the layers of filling. If you are using a knife, take your time to keep the thickness consistent. Your patience will be rewarded with evenly stacked layers later on.
After slicing, you might find the zucchini slices have a fair amount of moisture. That’s perfectly normal but can make your lasagna a bit too watery. A simple fix is to lay your zucchini slices out on a layer of paper towels and sprinkle them with a bit of salt. Let them sit for 10 minutes. Salt draws out excess moisture and will start to ‘sweat’ the zucchini. After they’ve had a chance to release some of their natural waters, gently pat them dry with another paper towel.
These steps not only improve the texture but also help in enhancing the flavor, as the slight reduction of water concentration intensifies the zucchini’s natural taste. Maintain a gentle touch while drying the slices; we’re looking to cozy up the water molecules, not squash our beautiful zucchini ribbons.
With your zucchini strips ready and prepped, you’re now well equipped to move on to the next thrilling step. Each slice is a blank canvas, ready to marry luxuriously with the creamy cashew ‘ricotta’, the vibrant pesto, and the other tantalizing components that will be layered in between. It is almost time to watch our Raw Zucchini Lasagna take shape, bursting with every shade of green and red, mirroring the very essence of a living raw food delight.
Assembling the Lasagna
With our prep work done and our zucchini ribbons efficient in their roles as pasta imposters, it’s time for the real magic to happen. We’re going to start assembling our Raw Zucchini Lasagna, layer by loving layer, assembling a dish this is as gorgeous to look at as it’s indulgent to eat.
Begin by taking your lasagna dish or serving platter and drizzle a little extra virgin olive oil on the bottom. This not only prevents sticking but also infuses the first layer with a subtle, fruity aroma. Lay down the first layer of zucchini slices, slightly overlapping each other to create a solid base. Consider of it as laying the foundation of a house, stable and strong, to support all the deliciousness to come.
Next, it is time for the cashew ‘ricotta’. Take your soaked cashews that have been waiting patiently, and blend them in the food processor with the lemon juice, a clove of garlic, some nutritional yeast, and a pinch of salt and pepper. The result should be a creamy, dreamy mixture this is just begging to be spread over our zucchini base. Use a spatula or the back of a spoon to evenly distribute a generous layer over the zucchini.
Once the cashew ‘ricotta’ is comfortably in place, introduce a layer of baby spinach leaves. Not only will these add a punch of color and a hit of iron, but their raw crunch is a lovely contrast to the creaminess beneath them. Then, let’s layer on those ripe tomato slices, and sprinkle a handful of chopped Kalamata olives for a touch of Mediterranean sass.
Now, whirl up your basil leaves in the food processor with the remaining olive oil, a second clove of garlic, and the sun-dried tomatoes you’ve soaked. This will create a thick pesto this is bold in both flavor and color. Dab or drizzle this across the tomatoes, allowing the oils and herbaceous notes to seep down through the tomatoes and spinach, adding depth to every bite.
Once your pesto is poised in place, it’s time to add another layer of zucchini ribbons, carefully pressing down to make sure there’s a good contact with the layer below. That’s the beauty of this dish – every layer is another opportunity to pack in flavor, another chance to impress the palate.
Repeat these layering steps, finishing with a flourish of cashew ‘ricotta’ and a final decorative arrangement of tomato slices and scattered basil leaves on top. The colors will pop, the textures will invite, and the flavors will promise an experience for the taste buds that is both grounding and exhilarating.
Remember, there’s no cooking involved, which means the integrity of each ingredient is preserved, its enzymes and nutrients ready to nourish you. It’s a dish that’s as alive as the ingredients it is made from, and it’s about to become the centerpiece of your gathering or the bright spot in your day.
The lasagna now stands assembled, a tower of raw, vibrant, Italian-inspired brilliance. Let it settle for a few minutes to allow the layers to form a more cohesive structure. The flavors melding together, the ‘ricotta’ slightly softening the zucchini, and the herbs spreading their aromatic magic throughout the dish is a thing to behold — and soon, to taste.
Tips for Serving and Storage
As you eagerly anticipate the first bite of your freshly assembled Raw Zucchini Lasagna, it is essential to discuss how to present and preserve this raw culinary creation. Let’s begin with the simple, yet significant, art of serving this dish.
Considering the delicate nature of the ingredients and their raw state, it’s best to treat the lasagna gently during the serving process. Use a wide spatula or a pie server to get underneath the layers, ensuring you support the entire cross-section of the lasagna to prevent it from falling apart. Serve chilled or at room temperature; heating is not an option here, as it would diminish the nutritional value and alter the textures we’ve worked so hard to achieve.
For an added touch of elegance, garnish each serving plate with a small drizzle of extra virgin olive oil, a sprinkle of finely chopped basil, or even some edible flowers for an impressive display. After all, we first eat with our eyes, and the vibrant colors and fresh look of this dish are definitely worth showcasing.
Now, let’s talk about storage. If, by some chance, you have leftovers or you are prepping ahead of time, storing the lasagna is simple but does require some attention. In the refrigerator, the prepared lasagna should be covered with plastic wrap or placed in an airtight container. This will help maintain its freshness and prevent the flavors from mingling with other foods in your fridge. Expect the lasagna to stay fresh for up to two days, though it’s at its best if consumed within the first 24 hours.
One thing to remember is that the water content in the zucchini may release over time, which can make the dish a bit more soggy than when first assembled. Although this might change the texture slightly, it won’t detract from the taste. Give your lasagna a little drain if necessary before serving leftovers.
Freezing this dish, however, is not advised. The raw zucchini and fresh ingredients won’t withstand the freezing and thawing process well, resulting in a dish that loses much of its appealing texture and could impact flavor balance.
With these tips for serving and storage, your Raw Zucchini Lasagna experience should be as delightful on the last bite as it was on the first. Enjoy the fruits of your labor immediately, or tuck away a little for later — either way, the freshness and flavors are a testament to the beauty of raw, whole foods.